What's new in Celonis Process Mining 4.7.2?
Important
If you’re a FedRAMP user, contact Support for access to all assets.
For Celonis Process Mining 4.7.2, we've focused on improved stability and ease of migration to Celonis.
Release Notes
Bug fixes
Important
You'll need to perform some steps before updating to Celonis Process Mining 4.7.2, including installing and running Celonis Process Mining 4.7.1. You'll find everything you need here.
Changes and improvements
Important changes
1. Deprecation note: legacy audit logger
With Celonis Process Mining 4.7.2, we are deprecating the legacy audit logger configured in <installDir>/component_configurations/audit-logging.properties .
In case the audit logs are used in your installation,a migration of the audit logging configuration to the new audit-logging-advanced.properties file is required.
Important
For detailed information and required steps, follow the instructions in the Celonis Process Mining 4.7.2 - Update Guide 1.13. If you don't follow these steps, no audit logs will be written.
Activating the new advanced audit logger:
Log onto the application server.
Stop the Celonis Process Mining application.
Navigate to
<installDir>/component_configurations/.Copy the
audit-logging-advanced.properties.samplefile and rename one of the files toaudit-logging-advanced.properties. Make sure the file is treated as a.PROPERTIESfile.Open the properties file and activate the required properties by setting them to
true.Start the Celonis Process Mining application.
2. Amazon Athena JDBC driver
With Celonis Process Mining 4.7.2, we no longer distribute the Amazon Athena JDBC driver (com.simba.athena.jdbc.Driver) with the application.
If you're currently using any Amazon Athena connection, follow the instructions in the Celonis Process Mining 4.7.2 - Update Guide 1.13 to deploy the Amazon Athena JDBC driver. This change is required to ensure full version compatibility.
Important
For detailed information and required steps, follow the instructions in the Celonis Process Mining 4.7.2 - Update Guide 1.13. If you don't follow these steps, your Amazon Athena connections will fail.
Deploying your own Amazon Athena JDBC driver:
Get the suitable JDBC driver from the vendor.
Log onto the application server.
Stop the Celonis Process Mining application.
Navigate to
<installDir>/liband paste the driver.jarfile into the folder.Start the Celonis Process Mining application.
3. Time zone information in stdout and advanced audit logs
The log format of the stdout log files (located in <installDir/logs>) and the advanced audit logs was adapted fromyyyy-MM-dd HH:mm:ssto yyyy-MM-dd'T' HH:mm:ss.SSSXXX, adding information about the application server time zone.
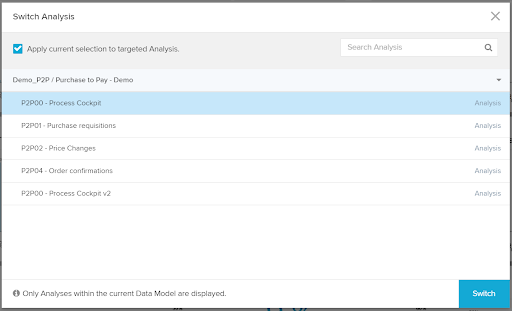
Switching analyses with selections
From Celonis Process Mining 4.7.2, you can browse and open another analysis from your current analysis. You can also forward the current selections to the target analysis if they are connected to the same data model.
Access the pop-up menu.
Select, whether the current selections should be carried to the target analysis.
Browse through the analyses.
Select and go to analysis.
 |
 |
Audit logging to database
With release 4.7.2, we support audit logging to external databases to enable advanced analysis of the logging events.
You can find the required new properties in the audit-logging-advanced.properties.sample file in <installDir>/component_configurations after the update. If you are already using the advanced audit logs, you can copy the new properties into the existing audit-logging-advanced.properties.sample file.
Important
For detailed information about the configuration of advanced audit logs, see the Celonis Process Mining 4.7.2 - Operation Guide 1.14.
Please find the following addition in the audit-logging-advanced.properties.sample file:
audit-logging-advanced.properties.sample
# Logging to the database is disabled by default
# To enable logging to the database, uncomment the next section, set audit_logging_advanced_config.database to true
# and configure a datasource
# audit_logging_advanced_config.database=true
# audit_logging_advanced_config.database.driverClassName=<driver>
# audit_logging_advanced_config.database.url=<url>
# audit_logging_advanced_config.database.username=<user>
# audit_logging_advanced_config.database.password=<password>
User and group report
The new user and group report lets you effortlessly export a list of the current users, groups, and group memberships. This functionality targets audits, system assessments, and migrations to Celonis.
To create the export in xlsx or csv format, simply navigate to:
<celonis_url>/api/user_group_roles_report/xlsx<celonis_url>/api/user_group_roles_report/csv
Note: The user generating the export requires the following three roles (e.g., the initial sysadmin user):
System Administrator.
Global Content Administrator.
User Administrator.
Content of the user and group report:
All users (incl. user information such as ID, name, e-mail, roles).
Groups the users are a member of (incl. group information such as ID, name, roles).
Effective roles of the users (taking into consideration the roles directly assigned to the users and the ones assigned to the users via group memberships).
Note: Any user can appear multiple times in the report if they are part of multiple groups.
Example (including selected columns):
User ID | User Name | System Admin | User Admin | Content Admin | Group ID | Group Name | G. System Admin | G. User Admin | G. Content Admin | Ef. System Admin | Ef. User Admin | Ef. Content Admin |
|---|---|---|---|---|---|---|---|---|---|---|---|---|
1 | sysadmin | true | true | true | true | true | true | |||||
2 | analyst | false | false | false | 12 | analysts | true | false | false | true | false | true |
2 | analyst | false | false | true | 14 | analysts_EMEA | false | false | false | true | false | true |
Permission report
In addition to the user report, you can generate a permission report. This report lists the content permissions (folder, analysis, data model) of every user and if access was granted on a user- or group level.
To create the export in xlsx or csv format, simply navigate to:
<celonis_url>/api/user_permissions_report/xlsx<celonis_url>/api/user_permissions_report/csv
Note: The user generating the export requires the following three roles (e.g., the initial sysadmin user):
System Administrator.
Global Content Administrator.
User Administrator.
Content of the permission report:
All content objects (incl. object information such as ID, name, type).
All users permitted to the content objects (incl. user information such as ID, name, email).
In case the access is granted on group level: ID and name of the group that provides the permission to the respective user.
The effective permissions on the content (Administrate, Create Document, Edit Document, View Document, Create Data Model, Edit Data Model, Use Data Model).
Further information about the project the content object is located in (ID, name).
The effective roles of the respective user (taking into consideration the roles directly assigned to the user and the ones assigned to the user via group memberships).
Note: Any given content object will appear multiple times in the report if more than one user can access it.
Example (including selected columns):
Entry ID | Entry Name | Entry Type | User ID | User Name | Group ID | Group Name | Create | Edit | View | Project ID | Project Name | Ef. Content Admin |
|---|---|---|---|---|---|---|---|---|---|---|---|---|
22 | P2P Analysis | Document | 2 | analyst | 12 | analysts | true | true | true | 1 | P2P | false |
23 | P2P_EMEA | Folder | 2 | analyst | false | false | true | 1 | P2P | false | ||
24 | P2P DM | Data Model | 4 | engineer | true | true | true | 1 | P2P | false |
Authorization report
Lastly, you can generate an authorization report. This report lists authorization objects that have a manual value mapping (authorization objects querying databases are not taken into consideration here)
To create the export in xlsx or csv format, simply navigate to:
<celonis_url>/api/user_authorizations_report/xlsx<celonis_url>/api/user_authorizations_report/csv
Note: The user generating the export requires the following three roles (e.g., the initial sysadmin user):
System Administrator.
Global Content Administrator.
User Administrator.
Content of the authorization report:
All data models with authorization objects assigned to them (incl. information such as ID, name).
All users the objects are assigned to (incl. information such as ID, name, email).
All authorization objects with manual value mapping (incl. information such as name, authorized table, authorized column, and authorized values).
The projects the respective data models are located in (incl. information such as ID, name).
Note: Any authorization object will appear multiple times in the report, if
It is assigned to more than one user or data model.
Multiple values are permitted to the user.
Example (including selected columns):
Data Model ID | Data Model Name | User ID | Username | Authorization Name | Table | Column | Value | Project Name | Project ID |
|---|---|---|---|---|---|---|---|---|---|
24 | P2P DM | 2 | analyst | P2P_EMEA | EKKO | MANDT | M1 | 1 | P2P |
24 | P2P DM | 2 | analyst | P2P_EMEA | EKKO | MANDT | M2 | 1 | P2P |
25 | P2P DM | 4 | engineer | P2P_EMEA | EKKO | MANDT | M2 | 1 | P2P |
26 | AP DM | 4 | engineer | AP_APAC | EKKO | MANDT | M2 | 2 | AP |
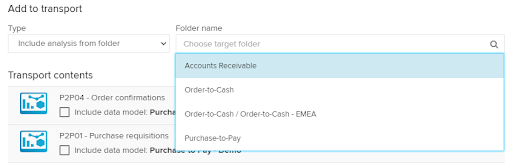
Improved transport creation
In the new version, you can now create transports more efficiently. We added the options to directly include:
All analyses from a selected folder.
All analyses from a selected folder and all its subfolders.
All data models from a selected project.
All analyses and data models from a selected project.
In addition to that, you can select the new transport creation options directly when viewing a folder or project.
 |
 |
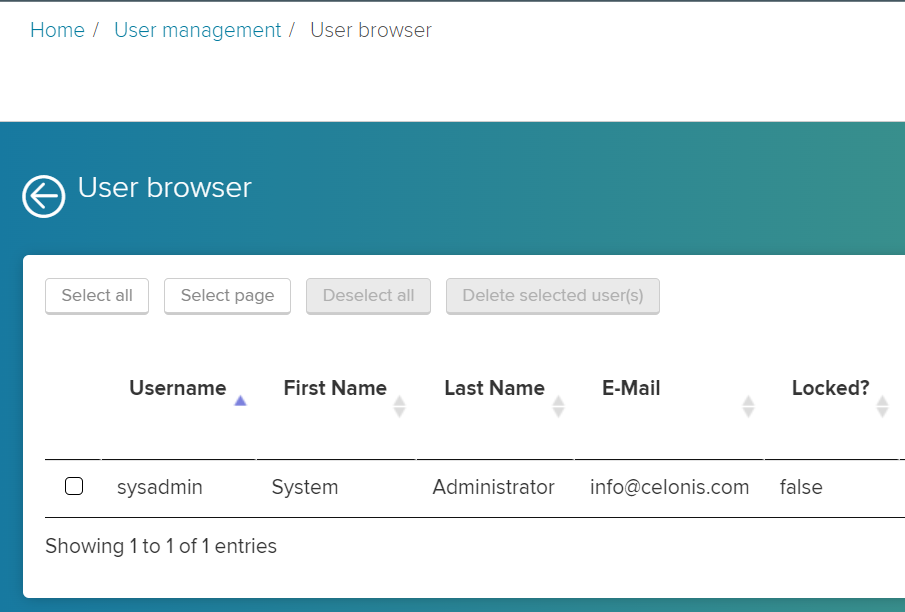
Bulk user deletion
Previously, it was cumbersome to delete large amounts of users from the front end. Therefore, we enabled bulk user deletions in the User Browser.
The end user is now able to:
Select all users.
Select all users on the current page.
Delete all selected users.
Deselect all.
Note:It is impossible to delete the initial sysadmin user or the current user from this screen.
 |
Other changes
"Include into axis range" for position lines in Scatter Plots
The checkbox to include position lines into the axis range was added to the Scatter Plot component.
When this option is active, the axis range will always be calculated to include the position line.
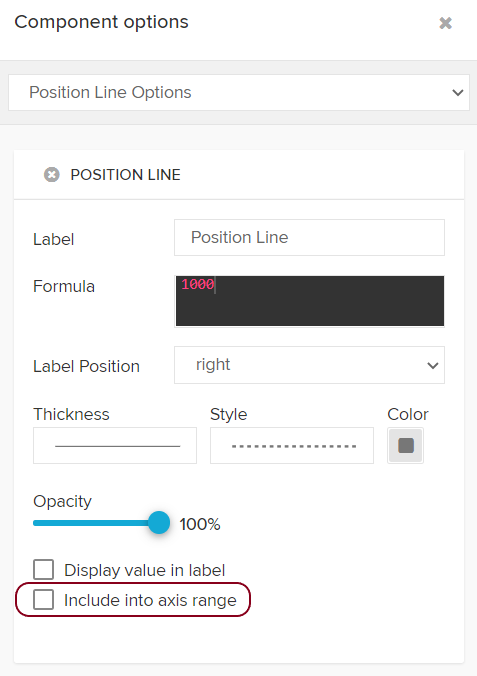 |
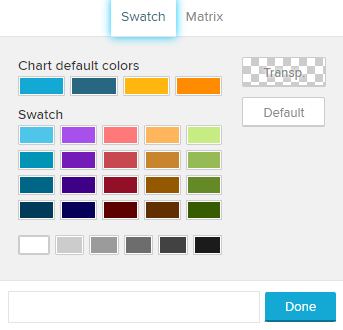
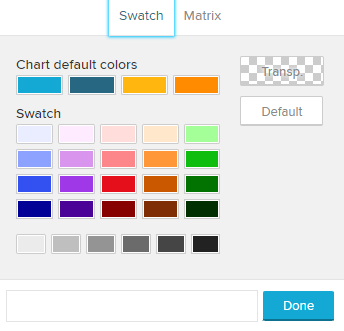
Chart color swatch
The color swatch of all chart components was optimized for colorblindness.
Previous | New | ||
|---|---|---|---|
|
|
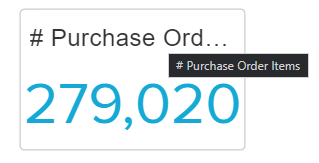
Mouseovers for component titles
All components now display the full component title on mouseover. This change is most useful for components that tend to be smaller, such as single KPI components.
 |
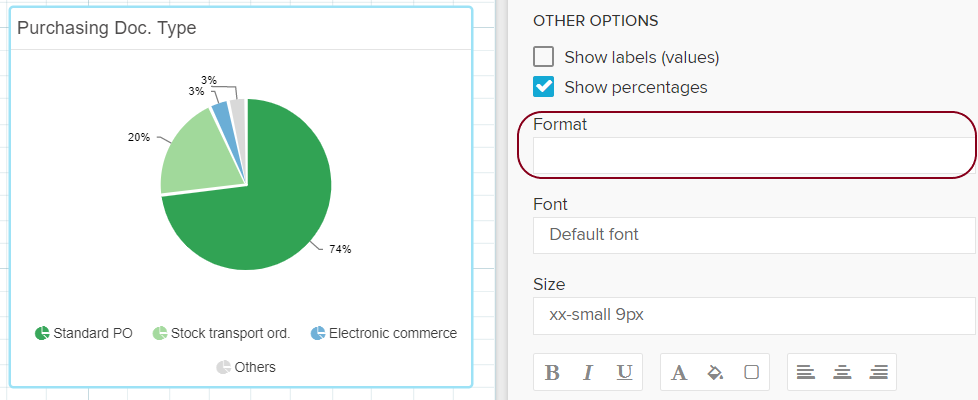
Formatting for percentages in pie charts and donut chart components
In release 4.7.2, we added custom formatting for the "Show percentages" option of data series within pie charts and donut charts.
 |
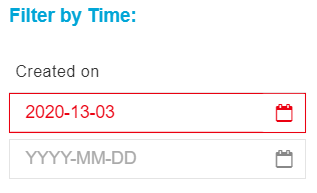
Input validation for date picker components
Date picker components now validate the input date. Invalid input is highlighted in red.
 |
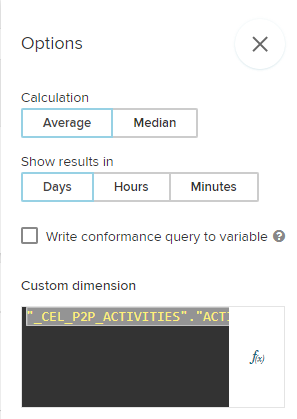
Custom dimension for the Conformance Checker
Users can now provide a custom dimension in the Conformance Checker to measure the conformance of a column other than the default activity column.
This setting is accessible in the settings of the Conformance Checker or while "Mining the target process".
 |